
Over the next few minutes, you will learn how to set up SPF, DKIM, and DMARC for your Google Workspace account to enhance your email security. These authentication methods help protect your domain from email spoofing and phishing attacks while improving your email deliverability. By following the steps outlined in this guide, you can ensure that your messages reach their intended recipients and bolster your organization’s reputation. Let’s dive in and simplify the setup process for a more secure email experience.
Key Takeaways:
- SPF (Sender Policy Framework) helps verify that your email is sent from an authorized server, reducing the risk of spoofing.
- DKIM (DomainKeys Identified Mail) adds a digital signature to your emails, allowing recipients to confirm the authenticity of the message.
- DMARC (Domain-based Message Authentication, Reporting & Conformance) builds on SPF and DKIM to provide domain owners with reporting and enforcement options for email authentication.
- Ensure you correctly configure DNS records for SPF, DKIM, and DMARC in your domain settings for effective email authentication.
- Utilize Google Workspace’s built-in tools and documentation to assist in the proper setup and management of SPF, DKIM, and DMARC records.
Configuring SPF: The First Line of Defense
The Sender Policy Framework (SPF) serves as your first line of defense against email spoofing. By specifying which mail servers are authorized to send emails on behalf of your domain, you significantly reduce the risk of your messages being flagged as spam or, worse, impersonated by malicious actors. Setting up SPF is crucial in ensuring that your emails reach their intended recipients while maintaining your domain’s integrity.
Identifying Your Domain’s Sending Sources
Before you can configure SPF, you need to identify all legitimate email sources associated with your domain. This includes Google Workspace servers, third-party email marketing services, and any other platforms that send emails using your domain name. Documenting these sources will help you craft a comprehensive SPF record, ensuring that all legitimate emails are properly authenticated.
Crafting Your SPF Record
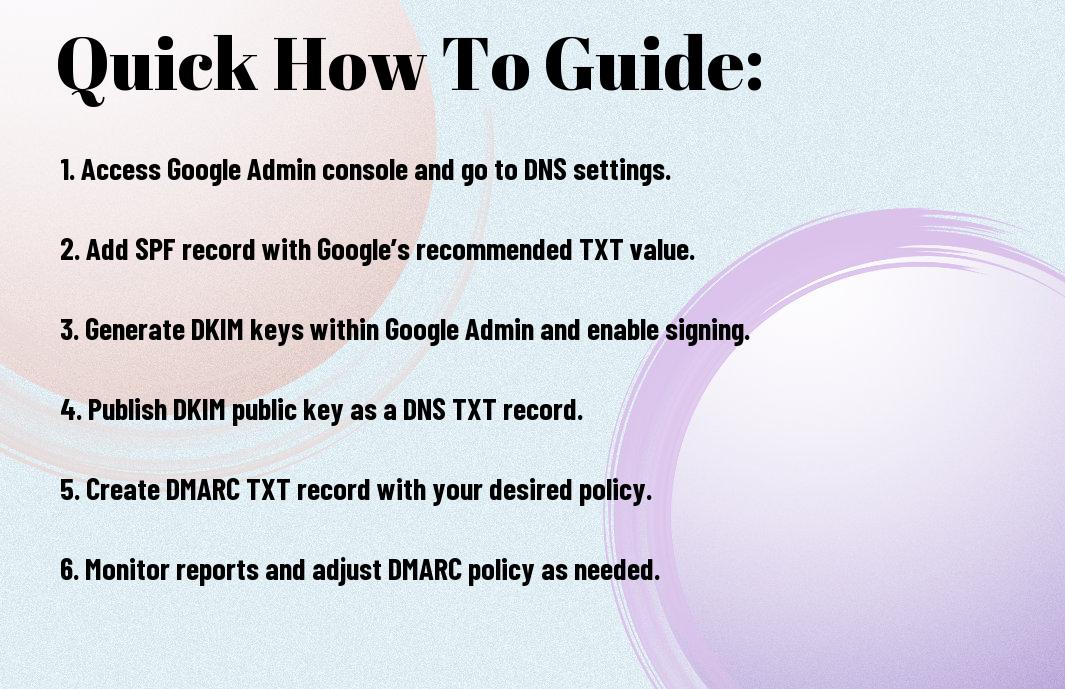
Your SPF record is a DNS text record that defines which mail servers are permitted to send emails on behalf of your domain. Start by listing the IP addresses or domains of all your sending sources. For Google Workspace, it typically includes `include:_spf.google.com`. Remember to tie this into the syntax of your DNS record, ensuring the entry begins with “v=spf1” to denote it’s an SPF record.
Creating a precise SPF record involves balancing the authorized senders while avoiding overly permissive entries. For instance, your SPF entry could look like this: `v=spf1 include:_spf.google.com ~all`. The `~all` tag indicates a soft fail for any emails coming from unauthorized servers, which is useful for identifying potential spoofing attempts without outright rejecting the messages initially. Over time, as you fine-tune your email practices, you can switch to a stricter `-all` to reject these unauthorized senders entirely.
Testing and Verifying Your SPF Setup
Once your SPF record is created and published, it’s crucial to test and verify its functionality. Use online tools such as MXToolbox to check your SPF record and confirm it is correctly configured. These tools will provide feedback on possible syntax errors and highlight any potential issues, allowing you to address them proactively.
Utilizing testing tools also provides insights into how your email is being perceived by recipient servers. After entering your domain, the tool checks your SPF record and simulates sending processes, giving you a clearer picture of how well your protection measures function. Regularly testing your SPF setup, especially after changes, ensures that your emails are always authorized and that you maintain a secure environment for your communications.

Elevating Email Security with DKIM
Implementing DKIM effectively enhances your email security by adding a layer of authentication that ensures the recipient can verify that the email was indeed sent by you, mitigating the risk of email spoofing and phishing attacks. With DKIM, your outgoing messages have a digital signature, which validates their authenticity and integrity, making it harder for malicious entities to attack your domain’s reputation.
Understanding the Role of DKIM in Authenticating Emails
DKIM, or DomainKeys Identified Mail, is a protocol that allows you to attach a cryptographic signature to your emails. This signature is linked to your domain and can be verified by the recipient’s server, confirming that the email was not altered in transit and was genuinely sent from your domain. This process significantly reduces the chances of your emails being marked as spam or misrepresented by attackers.
Generating Your DKIM Keys in Google Workspace
To generate DKIM keys in Google Workspace, you begin by accessing the Admin Console. Under Apps, go to Google Workspace and select Gmail. From there, you’ll navigate to Authenticate Email. Google provides the option to generate a new DKIM key, allowing you to choose the length of the key (2048 bits is recommended for stronger security). After setting your preferences, you will receive a TXT record needed for DNS configuration.
Adding DKIM to Your Domain’s DNS Records
Integrating DKIM into your domain’s DNS records involves taking the TXT record generated in Google Workspace and adding it to your domain’s DNS settings. This process authenticates your DKIM signature, ensuring that receiving mail servers can validate your emails. Log in to your DNS management panel, create a new TXT record, and paste the generated value into the record. Properly configuring this step establishes your domain’s authenticity in the eyes of other email servers.
Accessing your DNS management system, often provided by your web host or domain registrar, requires careful attention to detail. You’ll typically find an option to add a new record, where you must enter the DKIM selector (a component of the DKIM TXT record) and the value copied from Google Workspace. It may take some time for these changes to propagate, so patience is key; once active, this integration fortifies your email security and reputation.
Implementing DMARC: The Final Protective Measure
Setting up DMARC is your last line of defense against email spoofing and phishing attempts. By specifying how your domain handles emails that fail SPF and DKIM checks, you can enhance your domain’s email security and protect your brand’s reputation. Overall, DMARC provides actionable insights into your email traffic, allowing you to identify unauthorized use of your domain and safeguard your communications.
Setting Up Your DMARC Record for Effective Monitoring
To create an effective DMARC record, you’ll start by adding a DNS TXT record to your domain. The basic format includes specifying a policy (none, quarantine, or reject), an email address for receiving reports, and choosing how strict you want the policy to be. For instance, a policy of “p=none” is good for monitoring without affecting delivery, while “p=reject” will stop any emails that fail checks.
Interpreting DMARC Reports to Enhance Security
DMARC generates aggregate and forensic reports that reveal how your domain is being used. These reports provide insights into the sources sending emails on behalf of your domain, allowing you to identify legitimate senders and suspicious activity. Analyzing these reports can pinpoint vulnerabilities and help you adjust your settings accordingly.
Delving deeper into DMARC reports can significantly enhance your email security. By reviewing the daily aggregate reports, you can track the number of emails that passed or failed authentication checks, giving you a better understanding of potential threats. Investigating forensic reports further reveals specific instances of authentication failures, allowing you to trace back to unauthorized sources. This data empowers you to refine your DMARC policy over time, moving from a monitor-only setup to stricter enforcement as you gain confidence in the authenticity of your email sources.
Troubleshooting Common Issues with DNS Records
Addressing issues with DNS records can be frustrating, particularly when trying to ensure email deliverability through SPF, DKIM, and DMARC. Often, mistakes occur due to incorrect entries or propagation delays. Check for typos in your DNS records, ensure that the records are correctly formatted, and give some time for DNS propagation after making changes. Many DNS changes can take up to 48 hours to become effective. Conducting a thorough review of your records may reveal misconfigurations or missing elements that are at fault.
Analyzing SPF, DKIM, and DMARC Failures
Failure messages can provide you with critical information to address delivery issues. For SPF, it’s important to verify whether your sending IP is included in the SPF record. DKIM failures can often be traced back to a mismatch between your DKIM key and what’s published in your DNS. DMARC failures signify that your emails did not align with SPF or DKIM policies, which necessitates a deeper investigation into your overall configuration.
Utilizing Diagnostic Tools for Effective Resolutions
Diagnostic tools streamline the troubleshooting process for SPF, DKIM, and DMARC issues by providing detailed insights into problems. Services like MXToolbox or DMARC Analyzer assess your records and simulate email deliveries to identify errors. Simply inputting your domain can give you immediate feedback on any DNS misconfigurations or alignment failures. You can also use command-line tools, such as dig or nslookup, to query your DNS records and validate SPF, DKIM, and DMARC settings directly.
These tools enhance your ability to pinpoint and resolve issues quickly, saving time and improving your overall email deliverability. With the right approach, you can track down record problems, identify if your DNS changes have propagated correctly, and ensure that your email authentication practices are solid. This often leads to a more reliable email sending experience, reducing the chances of your messages being marked as spam or failing to deliver altogether.

Best Practices for Ongoing Email Authentication
Consistent monitoring and maintenance of your email authentication protocols ensure ongoing protection against impersonation and spam. Maintaining SPF, DKIM, and DMARC records helps you secure your domain, bolster your email deliverability, and uphold your reputation. Regular reviews of these settings can keep you updated, address any changes in your email practices, and adapt to evolving threats. Engaging in these practices not only protects your organization but also fosters trust with your recipients.
Regularly Updating Your DNS Records
Keeping your DNS records updated takes priority as your organization evolves. If you add new services or change email providers, you’ll need to adjust your SPF records accordingly. Always check that any authorized domains and IP addresses are accurately listed to avoid rejection of legitimate emails and maintain your email sender reputation.
Staying Informed on Email Security Protocols
Continual education on email security protocols is important to staying ahead of potential threats. Keep an eye on industry updates related to SPF, DKIM, and DMARC, as well as broader email security trends. Engaging with security forums, subscribing to relevant newsletters, or participating in webinars can provide you with timely information that helps you fortify your email systems against emerging vulnerabilities.
Regularly checking trusted sources and industry news can enhance your understanding of how cyber threats evolve. Organizations like the Email Security Alliance and various cybersecurity blogs offer insights into recent attacks, changes in protocols, and best practices. Additionally, consider joining communities where security professionals share their experiences and strategies. This active engagement helps you anticipate and counteract new forms of email fraud, ensuring that your authentication measures remain effective and up to date.
Conclusion
So, by following the steps outlined in this guide, you can effectively set up SPF, DKIM, and DMARC for your Google Workspace, enhancing your email security and ensuring proper authentication for your messages. Utilizing these protocols will not only protect your domain from phishing attacks but also improve your email deliverability. For more detailed insights, you can check out Learning to Setup SPF, DKIM, and DMARC in Google Workspace.
FAQ
Q: What is SPF and why is it important for Google Workspace?
A: SPF, or Sender Policy Framework, is an email authentication protocol that helps prevent spammers from sending messages on behalf of your domain. Setting up SPF for Google Workspace ensures that only authorized servers can send emails using your domain, reducing the risk of email spoofing and improving email deliverability.
Q: How do I set up SPF for my Google Workspace domain?
A: To set up SPF for Google Workspace, you need to create a TXT record in your domain’s DNS settings. The SPF record for Google Workspace typically looks like this: “v=spf1 include:_spf.google.com ~all”. After adding this record, allow some time for changes to propagate across DNS systems before testing the setup.
Q: What is DKIM and how do I enable it in Google Workspace?
A: DKIM, or DomainKeys Identified Mail, is an email authentication method that allows you to take responsibility for sending emails from your domain. To enable DKIM in Google Workspace, navigate to the Admin console, go to Apps > Google Workspace > Gmail > Authenticate Email. From there, you can generate a DKIM key, which you will then add as a TXT record in your DNS settings.
Q: Can DMARC improve email security for my Google Workspace? If so, how?
A: Yes, DMARC (Domain-based Message Authentication, Reporting, and Conformance) can significantly enhance email security. It allows domain owners to specify policies for how email receivers should handle emails that fail SPF and DKIM checks. To set up DMARC for your Google Workspace, create a TXT record in your DNS settings with a policy statement, for example: “v=DMARC1; p=none; rua=mailto:[email protected]”, and adjust the policy as needed over time based on reports.
Q: How can I test my SPF, DKIM, and DMARC configurations after setting them up?
A: To test your SPF, DKIM, and DMARC configurations, use online tools such as MXToolbox or DMARCian. You can enter your domain name to check the validity of your SPF records, DKIM signatures, and DMARC policies. Additionally, sending test emails to accounts that provide feedback on email authentication can help verify that the configurations are functioning as expected.